Unity 3D How can we reduce large texture size? (2023) – (resolved!)
Unity Texture so you may witness that sometimes even a single one of the Unity 3D Textures you import from the Asset Store to your project or from the graphic artists in your team takes up tens of MB (in rare cases hundreds of MB). This is usually because the picture is in a format such as uncompressed TIFF or TGA. By converting these images to PNG, you can significantly reduce the size of these files without any deterioration in quality.
For example, I reduced the size of the project from 1.08 GB to 510 MB by converting such textures of a 3D asset imported from the Asset Store to PNG. Don’t get me misunderstood: The area covered by the textures only in the Unity project decreases, the size of the built game does not change. But even this helps with issues such as the project taking up less space on your hard drive or the easier backup of the project.
You can read the rest of the article to see the editor script I wrote for this job.
Reducing Unity 3d Texture Size!
What you need to do is create a new C# script named ConvertTexturesToPNG in the Editor folder of your project (if this folder does not exist) and replace the contents of the script with the following code: GitHub Link.
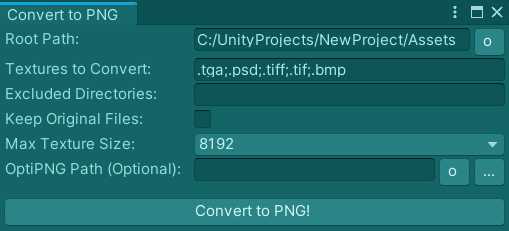
Then you can open the Convert to PNG window with Window-Convert Textures to PNG. The settings here are:
- Root Path: images in this folder are converted to PNG. Pictures in subfolders are also translated
- Textures to Convert: only images with these extensions are converted to PNG
- Excluded Directories: images in this folder (s) are untouched. The location of the two folders; (semicolon) (as in Textures to Convert)
- Keep Original Files: if checked, the originals of the images converted to PNG will not be touched; If not checked, the originals of the pictures are automatically deleted.
- Max Texture Size: images larger than this size will be reduced to this size.
- OptiPNG Path: with OptiPNG, a ready-made PNG compression library, it helps to reduce the size of images converted to PNG by about 20%. To do this, you must first download the optipng.exe file (here Windows build) and then enter this file’s location in this box. You can leave this field blank if you want.
- OptiPNG Optimization: appears only if the value of OptiPNG Path is entered. As this value increases, OptiPNG is more likely to reduce image sizes and takes much longer to convert images to PNG.
After filling in the settings, Convert to PNG! You can start the process by clicking the button. If the “Keep Original Files” option is turned off or the “Asset Serialization Mode” setting in the Editor Settings of your project is “Force Text“, the places where the images converted to PNG are used will be updated automatically (i.e. if the material was using Picture .tiff as Texture, for example, the material now automatically uses the Image.png as Texture). Otherwise, you should update all these references manually.
Finding Textures of Single Color in Unity 3D Project
Some of the Textures used in 3D model assets such as Specular, Metallic, or Emission can only consist of a single color. If we can achieve the same effect in the material by changing a float value like Smoothness, this is a completely futile performance loss because the video card has to read the value of a complete texture instead of reading the value of a simple float while drawing objects with that material on the screen. But sometimes even if we play with the float values in the material, we may not be able to achieve the effect of the monochrome texture.
In this case, there is another point that we can complain about: 3D modelers generally do not adjust the size of these monochrome Textures to small sizes such as 32×32, they set them to huge sizes such as 1024×1024. Because the texture is already made up of a single color, it will show the same effect whether it is 32×32 or 1024×1024, but due to the negligence of the 3D artist who made that texture, Texture takes up 0.5 MB more space and The build affects the size of the purchased game (since the built game is compressed, it will affect it less than 0.5 MB of course)!
I wrote a simple editor script to help detect the situations I mentioned above:
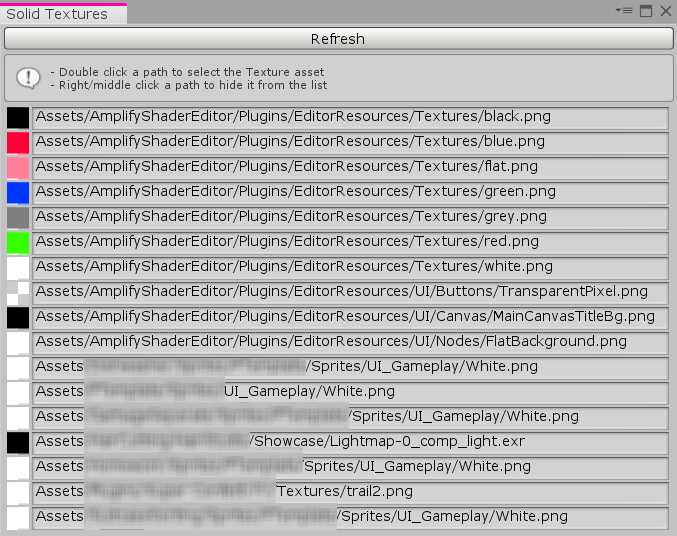
What you need to do is create a new C# script named SingleColorTextureDetector in the Editor folder of your project (if this folder does not exist) and replace the contents of the script with the following code: GitHub
Then you can open the Solid Textures window with Window-Single Color Texture Detector and click the Refresh button. When the process is completed, all textures in your project consisting of one color will be listed. If you double click on one of the listed locations, the Texture in that location will be automatically selected.
If the corresponding texture dimensions are larger than 32×32 and there is not much, very special situation that would require the texture to be large, the first thing is to reduce the Max Size of that Texture to 32. Thus, you will optimize both RAM and build size of that Texture. Then see if the materials must use Texture. If nothing changes when you remove the texture from the material, save your change, neither good nor good. If the appearance of the material changes when the texture is removed, check if you can get the same effect by changing the float values in the material. Save the changes you made that way if you can otherwise return the texture to the material.
For the rest of the article and other Unity3d related questions and articles, you can check out here: Unity 3D


